
In order to provide full participation and equitable access to multimedia content, text equivalents must be provided for both audio and video streams as well as access to all interactive components. While the focus of this workshop is to how to create and produce captions for audio content, many of the tools discussed can also be used to include text description of visual material.
Captions are exact text equivalents of the spoken word synchronized with the audio track. Captions should:
Subtitles are used for language support not to accommodate people with hearing impairments. They are similar to captions except they are a translation not a verbatim transcription of the spoken language and they do not include speaker information, sound effects, information about accent etc.
Video descriptors covey information about video content that is essential to understanding. This can be done by text stream or audio narration. These should be carefully written and only include information that is not conveyed by sound. Generally it is written to fit during natural pauses in the dialog. While many tools used for creating captions can be used to create video descriptors, it takes a unique skill.
Resources for video description:
Typically captions are displayed within the media player. They can either open or closed. Open captions are always in view, burnt onto the video track and thus cannot be turned off. They can be viewed by any media player that can support the video format.
Closed captions are under user control and are in a secondary text file delivered synchronized with the media track. They can only be displayed by media players that support open captions and have the ability to toggle the caption on/off. Most major media players support multiple caption files that can be toggled on/off. The advantage is captions can be provided in different languages.
Beyond providing access to people with hearing impairments, captions can be easily translated into different languages, make content available to those who have audio turned off, for indexing and searching.
Step 1: Create a text transcript of the audio track
Transcript are plain text file and can be generated by typing text form an audio file in any text editor. Creating transcripts is the most time consuming process as they must be an accurate representation of the narration, spoken dialogue, environmental sounds and speaker names. Transcription file are plain text file. The text can be a continuous stream or chunked into 40-50 character snippets.
 |
 |
It is easiest to create a transcript from an audio file. There are free and commercial tools that will extract audio form a movie. AoA is a audio extractor with a free version which has a 3 file limit per extraction.
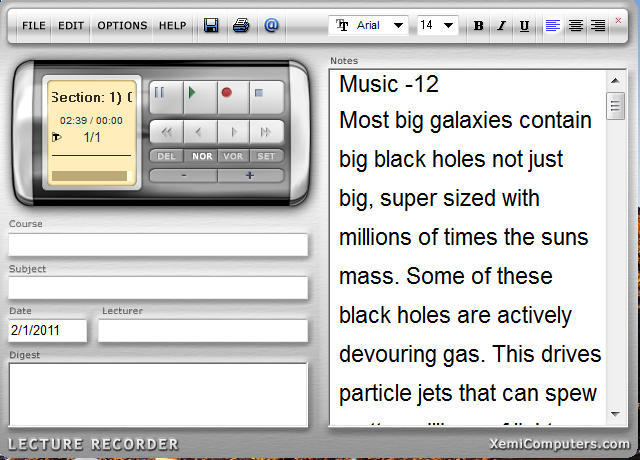
This can be a manual process like typing the text from the audio. Lecture Recorder is a free application that works like a software based dictaphone. It only works with audio (mp3) files. It has a pane for playing an audio file and pane for entering the text for transcript. The application includes a function playback the audio for transcription with settings for time to play, pause and rewind in seconds.
Depending on the typist this takes between 5-6 hours for 1 hour of audio.
There are many commercial typing services that will create transcripts. The price ranges between $1- 2.50 per minute.
Voice recognition software can also be used to generate the transcript text file. You can use commercial software like Dragon Naturally Speaking or ViaVoice or the voice recognition feature built into Windows and Mac OS. The software needs to be trained to the user's voice.
Currently, technologies are being developed that can use voice recognition to dynamically generate text equivalent of the spoken words without intervention. IBM, Camtasia and YouTube all claim to be able to perform real-time recognition. They use voice recognition engine but the recognition rate ranges between 80-95% which is not acceptable for captions and the text needs to be edited
The are commercial services that will do real-time captioning. Examples are Caption Mic and Caption Colorado
Step 2: Create a Caption File
In order to synchronize the text with the media file, we need to create a "timed text" file called a caption file. The file includes starting and ending time values for each snippet of transcript mapped to media file. This file is used by the media player to synchronize the display of the caption text with the dialogue and other audio elements.
Caption files, while they are plain text files they have platform specific code. They can be created manually using a basic text editor to enter the media specific code and time stamping or created by using captioning tools. There are many standalone tools and authoring environments with captioning capability to create the caption files.
Windows Media Player: SAMI (Synchronized Accessible Media Interchange) is the caption file for WMP. It uses structured language similar to HTML with extension .smi. The <head> section has information about video duration, title, copyright information, style etc and the <body> section has the start and end time information for the transcription. The tag <sync start =x> provides the time stamp for the snippet of text. It can be created using a text editor or a captioning tool like MAGpie
QuickTime: The caption file is a basic text file with .qt.txt extension. It contains the caption text, styling information and the start time for each snippet of text. This files starts with {QTtext} which identifies the file as a Quicktime caption file. It can be created using a text editor or a tool like MAGpie
Real Media: The caption file is text file with extension .rt. The language structure is similar to HTML. This file has a <clear> tag before and after a time stamp
TTML Timed Text Markup Language: is a content format that represents timed text media for the purpose of interchange among authoring systems. Timed text is textual information associated with timing information. It is for captions or sub-titles content for Mp4 and Flash. DFXP (Distribution Format Exchange Profile) is a flavor of TTML.
<?xml version="1.0" encoding="UTF-8"?>
<tt xml:lang="en" xmlns="http://www.w3.org/2006/04/ttaf1"
xmlns:tts="http://www.w3.org/2006/04/ttaf1#styling">
<head>
<styling>
<style id="1" tts:textAlign="right"/>
<style id="2" tts:color="transparent"/>
<style id="3" style="2" tts:backgroundColor="white"/>
<style id="4" style="2 3" tts:fontSize="20"/>
</styling>
</head>
<body>
<div xml:lang="en">
<p begin="00:00:00.00" dur="00:00:03.07">I had just joined <span tts:fontFamily=
"monospaceSansSerif,proportionalSerif,TheOther"tts:fontSize="+2">Most big galaxies contain big black holes not just big</p>
<p begin="00:00:03.07" dur="00:00:03.35">super sized with millions of times the suns mass. </p>
<p begin="00:00:06.42" dur="00:00:03.15">Some of these black holes are actively devouring gas. </p>
<p begin="00:00:09.57" dur="00:00:01.45">his drives particle jets that can spew matter millions of ,</p>
<p begin="00:00:11.42" dur="00:00:02.00">light years into space and also make the hole a source of penetrating or hard xrays.</p>
<p begin="00:00:13.57" dur="00:00:02.50">At these energies the sky glows in every direction even far away from bright sources.</p>
.....
</div>
</body>
</tt>
SubRip is a tool that rips subtitles or captions form videos and creates a simple text file with the subtitle number, timestamp, text and a blank line. This file has an extension .srt and is used by YouTube for captions.
1
00:00:20,000 --> 00:00:24,400
Altocumulus clouds occur between six thousand>
2
00:00:24,600 --> 00:00:27,800
and twenty thousand feet above ground level.
Step 3: Publishing files for distribution
The three major media players all use a container format to distribute the captioned media for playback.
Windows Media Player: use a container file .asx to stream the video (.asf . wmv) with the caption file (.smi) to a web page. The file points to the URL of both files.
<ASX version="3">
<entry>
<ref href="http://webserver.com/mediafilename.asf" SAMI=http://webserver.com/samifile.smi" />
</entry>
</ASX>
Quicktime and Real Media: both use a container format with extension .smil. SMIL allows the presentation of text, images, video, and audio, as well as other SMIL presentations. It is a XML file format with meta information with pointers to URL for the media files which could be located at different servers. There is minimal native browser support for .smil files so its needs plug-in to QuickTime or other media player to embed the media in the web page.
Quicktime points to the parser at Apple (http://www.apple.com/quicktime/resources/smil extensions) and uses QT specific media (.mov) and captions files with extension .qt.txt. RealMedia points to the parser at W3C (http://www.w3.org/TR/REC-smil") and uses media files (.rm) and caption files with extension .real.txt
<?xml version="1.0" encoding="UTF-8"?>
<smil xmlns:qt="http://www.apple.com/quicktime/resources/smilextensions"
xmlns="http://www.w3.org/TR/REC-smil" qt:time-slider="true">
<head>
<meta content="" name="title"/> <meta content="" name="Saroj Primlani"/>
<meta content="" name="copyright"/>
<layout>
<root-layout height="335" width="330" background-color="black"/>
<region id="videoregion" height="240" width="320" background-color="black" left="5" top="5"/>
<region id="textregion" height="80" width="320" background-color="black" left="5" top="245"/>
</layout>
</head>
<body>
<par dur="00:02:39.71"> <video region="videoregion" dur="00:02:39.71" src="astro.mov"/>
<textstream region="textregion" dur="00:02:39.71" src="astro.en_US.qt.txt"/>
</par>
</body>
</smil>
These material are copyrighted by EASI in 2011. We encourage your sharing useful individual pieces of information to help people. However, we request that you do not share the entire workshop without specific written permission.